Monday, March 28, 2011

Windows 7’s Previous Versions to Go Back in Time and Save Your Files

Use Windows 7’s Previous Versions to Go Back in Time and Save Your Files
image

Previous Versions is an incredibly useful feature built into Windows 7, which allows the OS to record and view earlier versions of files without a flux capacitor. Here’s a detailed guide to using this excellent feature.

This feature goes beyond the functionality of the Recycle Bin as it allows you to:

  • Recover files you may have permanently deleted.
  • View or restore a version of a file which you have saved over.
  • Allow you to compare current and/or previous versions of a file side by side.

With a little bit of dedicated hard drive space, an automation script and scheduled task, you can leverage this feature to guard against inadvertent file deletions and overwrites which traditional backups may not adequately cover.

Using Previous Versions: A Simple Demonstration

Before covering the configuration options, we are going to demonstrate the awesome power of previous versions. If you are already familiar with this, you can jump to the section about configuration.

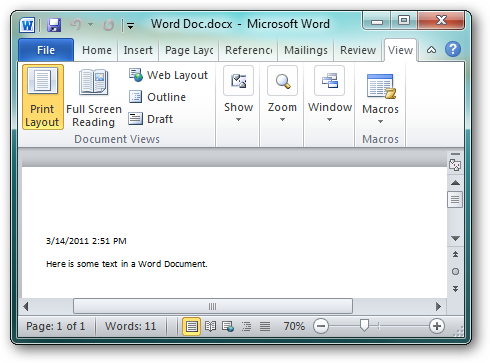
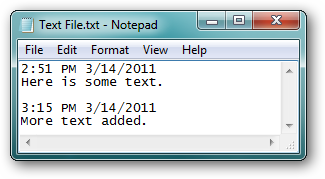
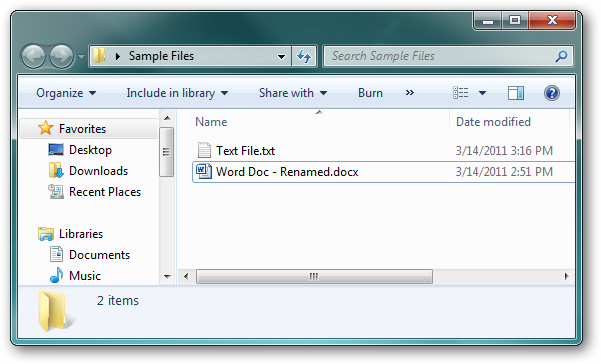
Assume we have a folder on our desktop which has 3 files which have previously been captured as previous versions. We will use these files throughout the demonstration.

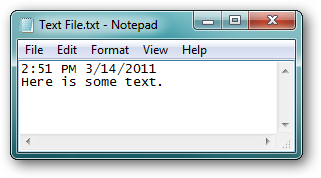
image

image

image

image

Making Changes to the Original Files

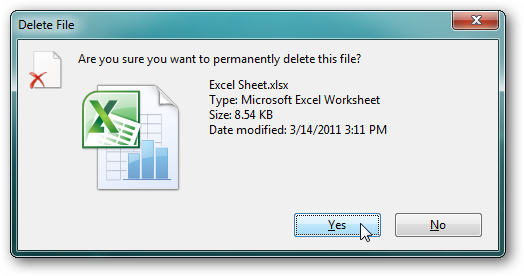
Now we are going to permanently delete (Shift+Delete) the Excel file,
image

edit the text file,

image

and rename the Word document.

image

Recovering the Original Files

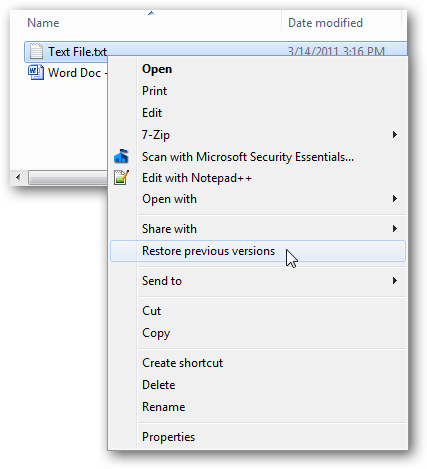
Once the text file is closed, we lose the ability to undo our changes. So in the event we need to recover a previous version of the file, simply right-click on the file and select the Restore Previous Versions menu option.
image

In the Previous Versions tab of the file’s Properties dialog, you will see all of the previous versions (or snapshots) of this file which have been captured. Select the version you want to view or restore from.

image

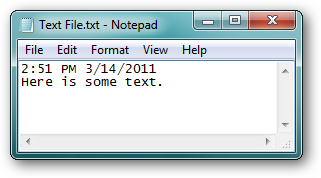
  • Clicking the Open button will open the the selected copy in the default program. This is the file at the time to snapshot was taken.
image

  • Clicking the Copy button will prompt you for the location where you want to create a copy of the selected version.

image

  • Clicking Restore will replace the current version with the selected version. You will be prompted to confirm you really want to do this.

image

But what about the Word Document we renamed or the Excel file we deleted? When you open the previous versions of the renamed file, there is nothing there. If a file is deleted, there is obviously no file to view the previous versions of.

image

In the event of a file being renamed or deleted, you have to view the previous version of the the containing folder. You do this by right-clicking on some white space in the folder and selecting the Properties option.

image

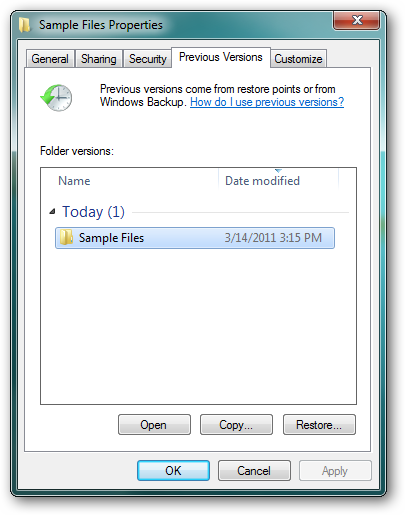
In the Previous Versions tab, you can see snapshots made of the folder as a whole.
image

By double-clicking the folder in the list or clicking the Open button you can view the contents of the folder at the time the snapshot was made. You can see here that the Word Document has the original file name and the contents also contain the Excel file which we permanently deleted.

From here you can view or copy the respective file versions. Additionally, you can use the Copy and Restore buttons in the Previous Versions tab exactly as you would have against an individual file.

image

Recovering a Deleted Folder

What about the case where an entire folder is deleted?

Currently our Sample Files folder is on the desktop, so we are going to permanently delete (Shift+Delete) it.

image

In order to recover this folder or a file inside of this folder, we have to view the previous version of the parent folder. In our case the desktop.

Unfortunately, if you right-click on the desktop, there is no Restore Previous Versions or Properties option.

image

So in order to get to this, we need to get to the Windows Explorer view of the desktop folder.

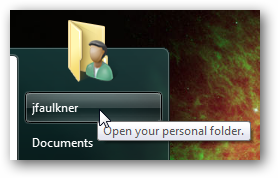
Open your profile folder from the Start Menu.
image

Inside of the Windows Explorer view of your profile, there is a Desktop folder. Right-click on this folder and select the Restore Previous Versions option.

image

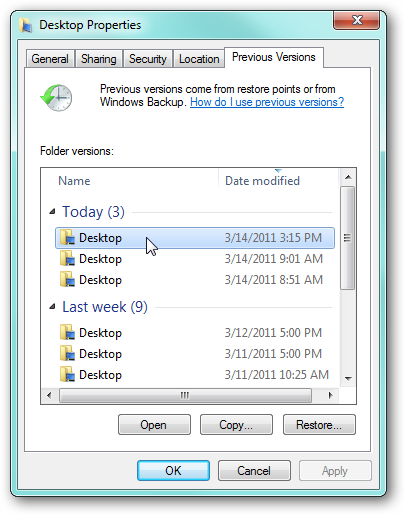
As you can probably guess, you can now view historical snapshots of your desktop contents.
image

Open the respective previous version and you can view the contents of the desktop at the time of the snapshot. Notice this snapshot contains the folder we permanently deleted previously.

image

By opening the Sample File folder, we can now recover the contents of what we previously deleted.

image

While this is just a very basic example, it demonstrates just how powerful this function is. The same methodology can be use to recover files from almost any folder on your computer, not just your documents.

Setting Up and Configuring Previous Versions

Previous versions of files are recorded as part of a System Restore Point. So whenever a restore point is created, if you have the option set to capture previous versions of files, this data will be recorded at that time. It is important to note that this function is smart enough to know that only changes to documents should be recorded. For example, if you have not updated a document in 3 months, a new snapshot is not captured each time a restore point is created.

To view or change your current settings, open the System item in the Control Panel and click the System Protection item. If you get a UAC prompt, select the option to continue.

image

Under the System Protection tab, select the drive containing the files you want to monitor for previous changes and click the Configure button.

image

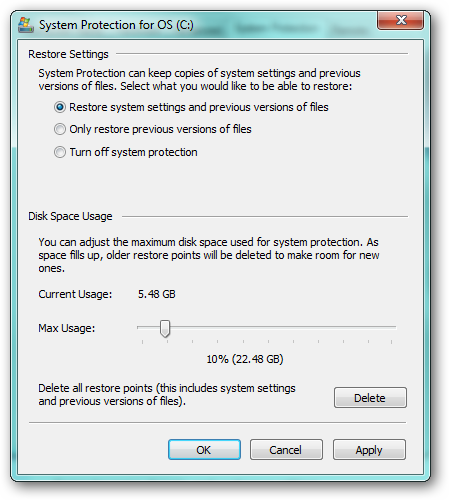
Under the Restore Settings section, make sure you have one of the options which includes previous files selected.

Under the Disk Space Usage, set the amount of space you want to allow for storing previous versions of files. The more space you allow here, the farther you can “go back” to a previous copy of a file. However, by dedicating space for this feature, you lose the respective amount of storage for new files so be sure to take this into consideration when making this setting.
image

Apply your settings and System Restore will start using them immediately.

Creating System Restore Points

As mentioned above, previous versions are captured as part of a System Restore Point. Restore points are created automatically by Windows whenever certain installations are done and also, according to Microsoft documentation, once a day (although my observations do not support this). However, if you want to take complete control over when restore points are taken, you can create them yourself either manually or via a scheduled task.

Manually Creating a Restore Point

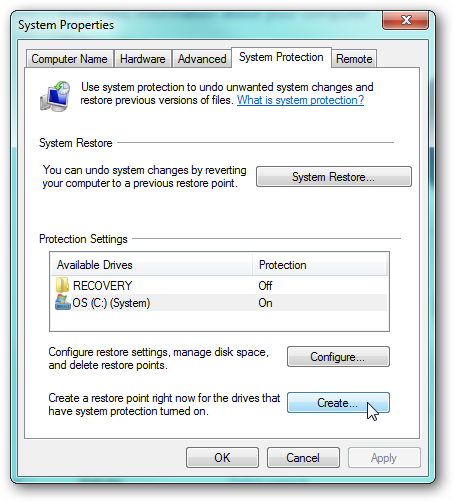
To create a System Restore Point manually, in the System Protection tab in the System Properties dialog, simply select the respective drive and click the Create button.
image

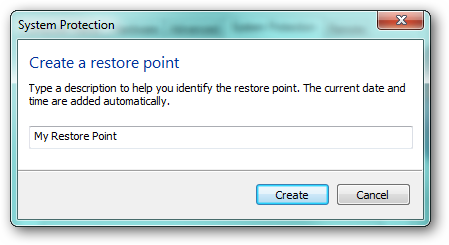
Give the new restore point a name and click Create.
image

Automating the System Restore Point Creation

If this function is something which you intend to use heavily or simply want some additional insurance against accidental file overwrites and deletes, creating a Scheduled Task to force the creation of a System Restore Point is the way to go. While there is not a simple command you can run to create a restore point, we have provided a VBScript file which allows you to automate the process of creating a restore point. You can download this script at the end of the article.

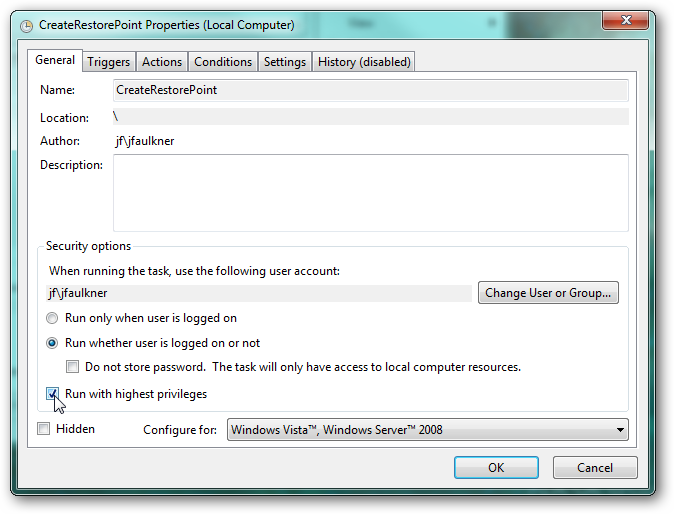
Create a new Scheduled Task which runs as an administrator on the respective machine. Make sure you have the Run with highest privileges box checked.
image

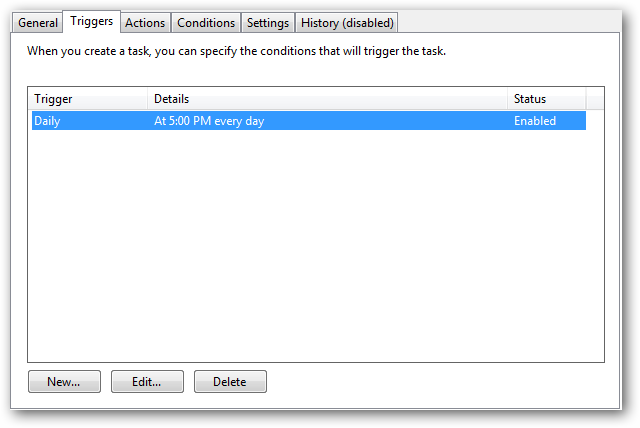
In the Triggers tab, configure how often you want a restore point created. Remember, snapshots of files are captured as part of the System Restore Point.
image

In the Actions tab, configure the task to run the CreateRestorePoint.vbs script provided at the end of the article.

image

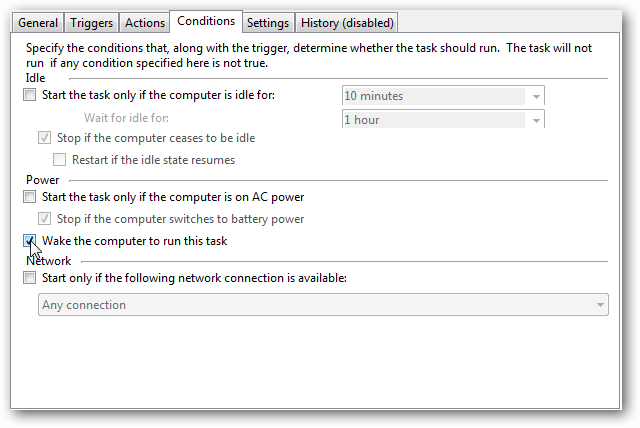
In the Conditions tab, select the option to Wake the computer to run this task.
image

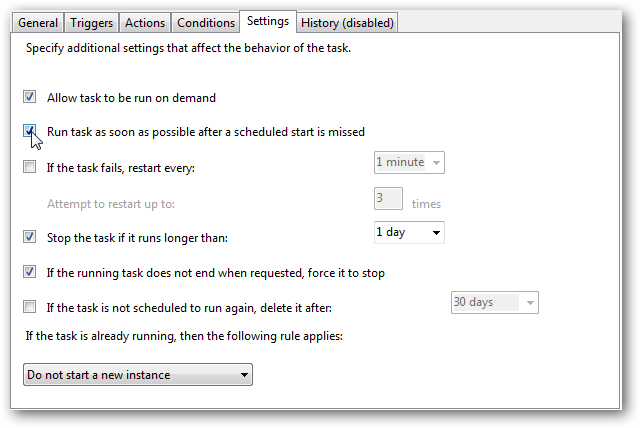
In the Settings tab, select the option to be able to run the task on demand as well as the option to run the task as soon as possible after a missed schedule.
image

Apply your changes and you are all set.

Previous Versions vs. Backups

As you can see the previous versions function is quite powerful. However, to be clear, this is not a replacement for regular system backups as it will not protect against drive failure. That said, previous versions offer several conveniences and functions that backups and file syncing services may not:

  • Ability to view or restore deleted/overwritten files with just a few clicks (in the event your backup drive is not available).
  • Ability to pick from several snapshots of the same file as they were captured at different points in time.
  • Historical snapshots can be created at regular, frequent intervals to provide in-day protection against accidental “oops”.
  • No uploading or downloading required.

Previous versions, however, make a great compliment to backups and file syncing services as it not only adds an extra layer of protection but also the conveniences from above at no additional cost.

Download CreateRestorePoint Script


taken from: http://www.howtogeek.com/56891/use-windows-7s-previous-versions-to-go-back-in-time-and-save-your-files/?utm_source=newsletter&utm_medium=email&utm_campaign=280311

Friday, March 25, 2011

reading writing files with javascript to local file / computer

this is quite interesting. writing/reading local files using javascript and mozilla:

/* Code from http://www.captain.at/programming/xul/ */
/* Filename: writeToFile.js */

writeToFile("C:\\Users\\me\\Documents\\myFile.txt","Hello World!!\r\nThis is the second line...\r\n");
alert(readFromFile("C:\\Users\\me\\Documents\\myFile.txt"));


function writeToFile(filename, data) {
try {
netscape.security.PrivilegeManager.enablePrivilege("UniversalXPConnect");
} catch (e) {
alert("Permission to save file was denied.");
}
var file = Components.classes["@mozilla.org/file/local;1"]
.createInstance(Components.interfaces.nsILocalFile);
file.initWithPath( filename );
if ( file.exists() == false ) {
//alert( "Creating file... " );
file.create( Components.interfaces.nsIFile.NORMAL_FILE_TYPE, 420 );
}
var outputStream = Components.classes["@mozilla.org/network/file-output-stream;1"]
.createInstance( Components.interfaces.nsIFileOutputStream );

// Open flags
var PR_RDONLY = 0x01
var PR_WRONLY = 0x02
var PR_RDWR = 0x04
var PR_CREATE_FILE = 0x08
var PR_APPEND = 0x10
var PR_TRUNCATE= 0x20
var PR_SYNC = 0x40
var PR_EXCL = 0x80

/*
** File modes ....
**
** CAVEAT: 'mode' is currently only applicable on UNIX platforms.
** The 'mode' argument may be ignored by PR_Open on other platforms.
**
** 00400 Read by owner.
** 00200 Write by owner.
** 00100 Execute (search if a directory) by owner.
** 00040 Read by group.
** 00020 Write by group.
** 00010 Execute by group.
** 00004 Read by others.
** 00002 Write by others
** 00001 Execute by others.
**
*/

outputStream.init( file, PR_RDWR | PR_CREATE_FILE | PR_APPEND, 420, 0 );
var result = outputStream.write( data, data.length );
outputStream.close();
}

var data;
function readFromFile(filename, data) {
try {
netscape.security.PrivilegeManager.enablePrivilege("UniversalXPConnect");
} catch (e) {
alert("Permission to read file was denied.");
}
var file = Components.classes["@mozilla.org/file/local;1"]
.createInstance(Components.interfaces.nsILocalFile);
file.initWithPath( filename );
if ( file.exists() == false ) {
alert("File does not exist");
}
var is = Components.classes["@mozilla.org/network/file-input-stream;1"]
.createInstance( Components.interfaces.nsIFileInputStream );
is.init( file,0x01, 00004, null);
var sis = Components.classes["@mozilla.org/scriptableinputstream;1"]
.createInstance( Components.interfaces.nsIScriptableInputStream );
sis.init( is );
var output = sis.read( sis.available() );
data = output;
return(data);
//document.getElementById('blog').value = output;
}

taken from a forum at: http://forum.iopus.com/viewtopic.php?f=11&t=5267

Wednesday, March 16, 2011

windows: bypass recycler bin

Note:This will delete your file from pc bypassing Recycle bin.

Most of the people knows about this little trick. Its easy to Bypass Recycle Bin.

1. At first select the file u want to delete

2. use the combination Shift+Del. It will bypass the Recycle Bin

You can disable Recycle Bin from registry. It will Bypass Recycle Bin while deleting any file from your PC. Follow this steps to use registry hack:

1. Go to Start > Run and type in regedit. Click Ok

2. No navigate to tHKEY_LOCAL_MACHINE\SOFTWARE\Microsoft\
Windows\CurrentVersion\Explorer\BitBucket
using Regedit.

3.You will see a value named NukeOnDelete. Double-click the NukeOnDelete DWORD value and change the Value Data to1
bypass recycle bin Delete Directly from Pc(Bypass Recycle Bin)

Now restart you pc and have fun. To change back to normal recycle bin options change the value to 0 in step 3.


taken from: http://www.bytetips.com/delete-directly-from-pcbypass-recycle-bin/

Friday, March 11, 2011

deny from all - restrict access to directory

To use .htacess files you have to enabled them in your Directory configuration, using AllowOverride All, for example. Of course there are many other options.

To deny all requests for the restricted directory or folder, prepare a .htaccess text file in that directory and put the following directive in it:

deny from all

taken from:
http://www.kavoir.com/2009/01/htaccess-deny-from-all-restrict-directory-access.html

Wednesday, December 22, 2010

egrep to filter out lines in a text file NOT cointaining certain strings

this worked for me:

egrep '^str2|str1' file.txt

winscp delete after successful transfer (put/get)

I've been using WinScp and a script to compress files at maximum compressión, name the file as name_YYMMDD-HHMM.rar, and send them to a remote server; then I wanted to delete local files after a successful transfer. Here's my batch file (it works on WinXP). :

;FOR /F "tokens=1-4 delims=/ " %%I IN ('DATE /t') DO SET mydate=%%K%%J%%I
;
;FOR /F "eol=; tokens=1-2 delims=: " %%a IN ('TIME /t') DO SET mytime=%%a%%b
;
;ECHO The value is "%mydate% %mytime%"
;
;set varname=myname-%mydate%-%mytime%.rar
;
;rar m -m5 %varname% "FolderWithFilesToCompress\*.jpg"
;echo %varname%

start /min winscp.exe /console /command "option batch on" "open lab@64.150.188.62" "option confirm off" "put -delete %varname%" "exit"


To call the batch file automatically in a minimized mode, I call from window's Task Scheduler this vbs script (the last 0 means minimized):

Set WinScriptHost = CreateObject("WScript.Shell")
WinScriptHost.Run Chr(34) & "C:\path\to\batch\mybatch.bat" & Chr(34), 0
Set WinScriptHost = Nothing

And here the documentarion on WinScp

Script Commands

In its scripting functionality, WinSCP supports set of commands described below.

You can see the very same help for the commands as shown here, if you type command help directly in console.

General Syntax

Command parameters that include space(s) have to be enclosed in double-quotes. To use double-quote literally, double it:

put "file with spaces and ""quotes"".html"

You can use environment variables in the commands, with syntax %NAME%1):

put "%FILE_TO_UPLOAD%"

You can reference script arguments (passed on command-line using parameter /parameter) using syntax %N%, where N is ordinal number of argument1):

put "%1%"

Note that WinSCP treats filenames in case sensitive manner. So even if your server treats filenames in case insensitive manner, make sure you specify case properly2).

Advertisements:

call

With SFTP and SCP protocols, executes arbitrary remote shell command. With FTP protocol, executes a protocol command.

call 

If current session does not allow execution of arbitrary remote command separate shell session will be automatically opened.

The command must not require user input.

Alias: !

XML Log Element: call

Examples:

call mysqldump --opt -u USERNAME --password=PASSWORD --all-databases > all_databases.sql
call gzip -c all_databases.sql > all_databases.gz

cd

Changes remote working directory for active session.

cd [  ]

If directory is not specified, changes to home directory.

Examples:

cd /home/martin
cd

chmod

Changes permissions of one or more remote files.

chmod   [  ... ]

mode can be specified as three or four-digit octal number.

Filename can be replaced with wildcard to select multiple files.

XML Log Element: chmod

Examples:

chmod 644 index.html about.html
chmod 1700 /home/martin/public_html
chmod 644 *.html

close

Closes session.

close [  ]

Closes session specified by its number. When session is not specified, closes currently selected session.

Examples:

close 1
close

exit

Closes all sessions and terminates the program.

Advertisements:
exit

Alias: bye

get

Downloads one or more files from remote directory to local directory.

get  [ [  ... ] \[  ] ]

Downloads one or more files from remote directory to local directory. If only one parameter is specified downloads the file to local working directory. If more parameters are specified, all except the last one specify set of files to download. The last parameter specifies target local directory and optionally operation mask to store file(s) under different name. Destination directory must end with backslash. Filename can be replaced with wildcard to select multiple files. To download more files to current working directory use .\ as the last parameter.

Use option command to set transfer options.

Alias: recv

Switches:

Switch Description
-delete Delete source remote file(s) after transfer.
-resume Automatically resume transfer if possible (SFTP and FTP protocols only). Cannot be combined with -append.
-append Append source file to the end of target file (SFTP protocol only). Cannot be combined with -resume.
-preservetime Preserve timestamp
-nopreservetime Do not preserve timestamp
-speed= Limit transfer speed

Effective options: transfer, confirm, exclude, include, reconnecttime

XML Log Elements: download, rm (with -delete)

Examples:

get index.html
get -delete index.html about.html .\
get index.html about.html d:\www\
get public_html/index.html d:\www\about.*
get *.html *.png d:\www\*.bak

See also synchronize if you need to transfer modified or non-existing files only.

help

Displays help for script commands.

help [  [  ... ] ]

Displays list of commands when no parameters are specified. Displays help for each command when some are specified.

Alias: man

Examples:

help ls
help

keepuptodate

Watches for changes in local directory and reflects them on remote one.

keepuptodate [  [  ] ]

When directories are not specified, current working directories are synchronized. To stop watching for changes press Ctrl-C.

Note: Overwrite confirmations are always off for the command.

Switches:

Switch Description
-delete Delete obsolete files
-permissions= Set permissions (SFTP and SCP protocols only)
-nopermissions Keep default permissions
-speed= Limit transfer speed

Effective options: transfer, exclude, include, reconnecttime

XML Log Elements: upload, touch, chmod (with -permissions), rm (with -delete)

Examples:

keepuptodate -delete
keepuptodate d:\www /home/martin/public_html

lcd

Changes local working directory for all sessions.

lcd 

Example:

lcd d:\

lls

Lists the contents of local directory.

Advertisements:
lls [  ]\[  ]

If directory is not specified, lists working directory. When wildcard is specified, it is treated as set of files to list. Otherwise, all files are listed.

Examples:

lls *.html
lls d:\
lls

ln

Creates remote symlink.

ln  

Alias: symlink

Example:

ln /home/martin/public_html www

lpwd

Prints current local working directory (valid for all sessions).

lpwd

ls

Lists the contents of specified directory.

ls [  ]/[  ]

Lists the contents of specified remote directory. If directory is not specified, lists working directory. When wildcard3) is specified, it is treated as set of files to list. Otherwise, all files are listed.

Alias: dir

XML Log Element: ls

Examples:

ls *.html
ls /home/martin
ls

mkdir

Creates remote directory.

mkdir 

XML Log Element: mkdir

Example:

mkdir public_html

mv

Moves or renames one or more remote files.

mv  [  ... ] [ / ][  ]

Destination directory or newname or both must be specified. Destination directory must end with slash. Operation mask can be used instead of new name. Filename can be replaced with wildcard to select multiple files.

Alias: rename

XML Log Element: mv

Examples:

mv index.html public_html/
mv index.html about.*
mv index.html public_html/about.*
mv public_html/index.html public_html/about.html /home/martin/*.bak
mv *.html /home/backup/*.bak

open

Establishes new connection.

open 
open [ sftp|ftp|scp:// ][ [ :password ] @ ] [ : ]

Establishes connection to given host. Use name of the stored session (to open session, stored in folder, use path syntax “folder/session”). You can also specify host, username, port and protocol directly.

Switches:

Switch Description
-privatekey= Private key path
-timeout= Server response timeout
-hostkey=“ Specifies fingerprint of expected SSH host key (or several alternative fingerprints separated by semicolon). It makes WinSCP automatically accept hostkey with the fingerprint. As the hostkey fingerprint contains spaces you need to enclose it in quotes. SFTP and SCP protocols only.
-certificate=“ Specifies fingerprint of expected SSL/TLS sertificate (or several fingerprints separated by semicolon). It makes WinSCP automatically accept certificate with the fingerprint. FTPS protocol only.
-passive Passive mode (FTP protocol only)
-implicit Implicit TLS/SSL (FTPS protocol only)
-explicitssl Explicit SSL (FTPS protocol only)
-explicittls Explicit TLS (FTPS protocol only)

XML Log Element: session

Examples:

open sftp://martin@example.com -hostkey="ssh-rsa 1024 xx:xx:xx:xx:xx:xx:xx:xx:xx:xx:xx:xx:xx:xx:xx:xx"
open scp://test@example.com:2222 -privatekey=mykey.ppk
open ftps://martin@example.com -implicit -certificate="xx:xx:xx:xx:xx:xx:xx:xx:xx:xx:xx:xx:xx:xx:xx:xx:xx:xx:xx:xx"
open martin@example.com
open example.com
open

option

Shows or sets value of script options.

option [ 

If no parameters are specified, lists all script options and their values. When one parameter is specified only, shows value of the option. When two parameters are specified sets value of the option. Initial values of some options are taken from application configuration, however modifing the options does not change the application configuration.

Options are:

Option Values and description
echo on|off
Toggles echoing of command being executed.
Commands affected: all
batch on|off|abort|continue
Toggles batch mode (all prompts are automatically replied negatively). When on, it is recommended to set confirm to off to allow overwrites. With abort script is aborted when any error occurs. With continue all errors are ignored.
Commands affected: nearly all
confirm on|off
Toggles confirmations (overwrite, etc.).
Commands affected: get, put
transfer binary|ascii|automatic
Transfer mode: binary, ascii (text), automatic (by extension).
Commands affected: get, put, synchronize, keepuptodate
exclude
include
clear | [;...]
Sets exclusion or inclusion masks (only one can be set at time).
Commands affected: get, put, synchronize, keepuptodate
reconnecttime off |
Sets time limit in seconds to try reconnecting broken sessions.
Commands affected: get, put, synchronize, keepuptodate

Aliases: ascii (for option transfer ascii), binary (for option transfer binary)

Examples:

option transfer
option confirm off
option include "*.html; */"
option exclude "*.tpl.php"
option exclude "*.mp3; *.mp4; *.lnk; *.exe; *.msi; My Pictures; My Music; My Videos;"
option

Note that resetting the same option overwrites previous values, it does not append.

put

Uploads one or more files from local directory to remote directory.

put  [ [  ... ] /[  ] ]

If only one parameter is specified uploads the file to remote working directory. If more parameters are specified, all except the last one specify set of files to upload. The last parameter specifies target remote directory and optionally operation mask to store file(s) under different name. Destination directory must end with slash. Filename can be replaced with Windows wildcard3) to select multiple files. To upload more files to current working directory use ./ as the last parameter.

Use option command to set transfer options.

Switches:

Switch Description
-delete Delete source local file(s) after transfer.
-resume Automatically resume transfer if possible (SFTP and FTP protocols only). Cannot be combined with -append.
-append Append source file to the end of target file (SFTP protocol only). Cannot be combined with -resume.
-preservetime Preserve timestamp
-nopreservetime Do not preserve timestamp
-permissions= Set permissions (SFTP and SCP protocols only)
-nopermissions Keep default permissions
-speed= Limit transfer speed

Alias: send

Effective options: transfer, confirm, exclude, include, reconnecttime

XML Log Elements: upload, chmod (with -permissions), touch (with -preservetime)

Examples:

put index.html
put -delete index.html about.html ./
put -permissions=644 index.html about.html /home/martin/public_html/
put d:\www\index.html about.*
put *.html *.png /home/martin/backup/*.bak

See also synchronize if you need to transfer modified files only.

pwd

Prints current remote working directory for active session.

pwd

rm

Removes one or more remote files.

rm  [  ... ]

If remote recycle bin is configured, moves file to the bin instead of deleting it. Filename can be replaced with wildcard to select multiple files.

XML Log Element: rm

Examples:

rm index.html
rm index.html about.html
rm *.html

rmdir

Removes one or more remote directories.

rmdir  [  ... ]

If remote recycle bin is configured, moves directory to the bin instead of deleting it.

XML Log Element: rm

Example:

rmdir public_html

session

Manages opened sessions.

session [  ]

Makes session specified by its number active. When session number is not specified, lists connected sessions.

Examples:

session 1
session

synchronize

Synchronizes directories.

synchronize local|remote|both [  [  ] ]

When the first parameter is local, changes from remote directory are applied to local directory. When the first parameter is remote, changes from the local directory are applied to the remote directory. When the first parameter is both, both local and remote directories can be modified.

When directories are not specified, current working directories are synchronized.

Note: Overwrite confirmations are always off for the command.

Switches:

Switch Description
-delete Delete obsolete files. Ignored for both.
-mirror Mirror mode (synchronize also older files). Ignored for both.
-criteria= Comparison criteria. Possible values are time, size, both and none. Ignored for both mode.
-permissions= Set permissions (SFTP and SCP protocols only)
-nopermissions Keep default permissions
-speed= Limit transfer speed

Effective options: transfer, exclude, include, reconnecttime

XML Log Elements: download (with local or both), upload (with remote or both), touch (with remote or both), chmod (with remote or both and -permissions), rm (with remote and -delete)

Examples:

synchronize remote -delete
synchronize both d:\www /home/martin/public_html
1) Generally do enclose reference to double-quotes to cope properly with spaces in its value.
2) This is important particularly for FTP sessions.
3) Windows wildcard supports * and ? only. It does not support all the features of file masks.
script_commands.txt · Last modified: 7 Nov 2010 by prikryl

Search

This page


Sunday, December 19, 2010

sed script to strip ^M characters

this may also be handy, to strip ^M characters:
(from http://www.computing.net/answers/unix/remove-m-and-line-feeds/6934.html)
anupam May 23, 2005 at 21:11:55 Pacific

Hi..to remove ^M, give the command :
sed -e 's/^M//g' filename
you will have to write the control-M as follows : first press control-V,then control-M,this will show the correct control-M on the command line.
For removing the linefeeds,try this :
sed -e 's/.$//g' filename
this will remove the last character from the line,which happens to be the line feed.

Saturday, December 18, 2010

installink XEphem on Ubuntu

had I found this link earlier, i wouldn't have wasted so much time and effort:

http://www.tc.umn.edu/~brams006/xephem_ubuntu.html

How to Compile XEphem on Ubuntu Linux

Following is a (hopefully) painless guide to compiling the excellent astronomy program named XEphem (http://www.clearskyinstitute.com/xephem/) on the Ubuntu linux distribution. Though we now have Stellarium and KStars, XEphem has some unique features and the source code is free for personal/educational use (check the URL for precise terms). In addition, it doesn't require a higher-end OpenGL graphics card. It'll run well on a fairly modest machine. I've tested these steps on Ubuntu 10.04 Lucid Lynx and they worked for me without any trouble.

(1) Preliminaries & Packages.

Use either "sudo apt-get install" or Synaptic to pull down (or verify that you already have) the following packages installed:

gcc
lesstif2-dev
libc6-dev
libxmu-dev
make

Since I embarked on this document (perhaps in 2005), I've noticed a couple changes with the Ubuntu packages. When you install the gcc compiler it sets up a symlink automatically from /usr/bin/gcc to the /usr/bin/gcc-{version number} executable. In the past, you may have needed to create this symlink yourself. For the newbies: 'cd /usr/bin', then 'ln -s gcc-4.4 gcc' or whatever was the gcc version.

If you'd rather compile with libmotif3 and libmotif3-dev (instead of the lesstif2 and lesstif2-dev respectively), you'll need to go into Synaptic (or edit /etc/apt/source.list manually), enable the Non-free Multiverse repository, and install those packages instead. There are some licensing politics surrounding motif.

In any case, I've successfully compiled XEphem 3.7.4 with gcc-4.x and the LGPL lesstif2/lesstif2-dev Ubuntu maintained packages, as well as the libmotif3/libmotif3-dev alternative.

(2) Get the XEphem source code.

Go here: http://www.clearskyinstitute.com/xephem/. Download it to a directory, for instance your user directory, and ungzip/untar it. It'll be in a directory named "xephem-3.7.4" (depending on version number).

(3) Make a change to the xephem-3.7.4/libz/Makefile

This file may initially be read-only, so be sure to chmod +w it if necessary. I noticed this issue with the source for XEphem 3.7.1 and 3.7.2 as well. There's a couple things missing from the makefile in the xephem-3.7.4/libz/Makefile file. Make sure the top of that file includes this:

CC = gcc
CLDFLAGS = -g
CFLAGS = $(CLDFLAGS) -Wall -O2
LDFLAGS =

And the bottom of the file needs to have "gcc" specified rather than cc.:

testzlib: testzlib.o libz.a
gcc $(LDFLAGS) -o testzlib testzlib.o libz.a

(4) Compile XEphem.

Whether you're using motif or lesstif, the XEphem makefiles expect some value for "MOTIF=" in order to compile. Go to the xephem-3.7.4/GUI/xephem directory. Issue this:

make MOTIF=/usr/lib/

XEphem should now successfully compile after a minute or so, depending on the speed of your hardware.

(5) Run and test.

Go to /xephem-3.7.4/GUI/xephem and type "./xephem" to execute. The first things you might want to do is to set the observer location to your own and confirm that your time/zone information is correctly indicated.

I like to create a KDE desktop icon for XEphem. From the KDE desktop, right-click and create a new link to an application. Go to the directory /xephem-3.7.4/GUI/xephem and select the xephem executable, change the icon to the XEphem.png file there. Then make sure the working directory is set to /xephem-3.7.4/GUI/xephem (or wherever you actually installed it).

As of Ubuntu 10.04 I decided to switch to Gnome. I see that the Gnome desktop application launcher doesn't include a "working directory" setting. Unless XEphem is executed from the path it resides in, some components may be improperly pathed. Being less experienced with Gnome, I'm not sure if this is the best approach, but it was awfully simple:

In the ~/xephem3.7.4/ directory I created a simple script called xephem.sh, and chmod +x to it. Here's the contents of the script:

cd /home/{my user directory}/xephem-3.7.4/GUI/xephem
./xephem

I then aimed the Gnome desktop launcher at this script, and used the icon here: /xephem-3.7.4/GUI/xephem/XEphem.png.

Enjoy!


The views and opinions expressed in this page are strictly those of the page author.
The contents of this page have not been reviewed or approved by the University of Minnesota.

missing files

when installing from source file, using make, and it says error "file not found" check apt-file utility for which package you need to install


FROM: http://superuser.com/questions/10997/find-what-package-a-file-belongs-to-in-ubuntu-debian

I frequently find myself missing a program, man page, or other file when working on my Ubuntu 8.04 system. Is there any simple way to look up what package contains a given file (whether it is installed already or not)? Maybe some obscure option for apt or dpkg?

link|flag


3 Answers

up vote 7 down vote accepted
apt-file search filename

or

apt-file search /path/to/file


if you need apt-file, use:

apt-get install apt-file

you may also want to update its database:

sudo apt-file update

running a windows scheduled task minimized

also you can do start /min \path\to\program.exe inside the batch, to run programs from the batch file in minimized mode


You could run it silently using a Windows Script file instead. The Run Method allows you running a script in invisible mode. Create a .vbs file like this one

Set WinScriptHost = CreateObject("WScript.Shell")
WinScriptHost.Run Chr(34) & "C:\Scheduled Jobs\mybat.bat" & Chr(34), 0
Set WinScriptHost = Nothing

and schedule it. The second argument in this example sets the window style. 0 means "hide the window."

Complete syntax of the Run method:

 object.Run(strCommand, [intWindowStyle], [bWaitOnReturn])

Arguments:

  • object: WshShell object.
  • strCommand: String value indicating the command line you want to run. You must include any parameters you want to pass to the executable file.
  • intWindowStyle: Optional. Integer value indicating the appearance of the program's window. Note that not all programs make use of this information.
  • bWaitOnReturn: Optional. Boolean value indicating whether the script should wait for the program to finish executing before continuing to the next statement in your script. If set to true, script execution halts until the program finishes, and Run returns any error code returned by the program. If set to false (the default), the Run method returns immediately after starting the program, automatically returning 0 (not to be interpreted as an error code).
link|flag


taken from: http://serverfault.com/questions/9038/run-a-bat-file-in-a-scheduled-task-without-a-window


Friday, November 12, 2010

beautifying my code

these changes give more legibility to code:

sed script to change:

  • if( -> if (
  • if....){ _> if...) {
  • }else -> } else
  • else{ -> else {
  • for( -> for (
  • for...){ -> for...) {

find . -type f -name "*.php" -exec sed -i -e 's/if(/if (/g' -e 's/if\(.*\)){/if\1) {/g' -e 's/for(/for (/g' -e 's/for\(.*\)){/for\1) {/g' -e 's/else{/else {/g' -e 's/}else/} else/g' {} \;

I had forgotten "foreach":

find . -type f -name "*.php" -exec sed -i -e 's/foreach(/foreach (/g' -e 's/foreach\(.*\)){/\1) {/g' {} \;


sed script to trim trailing spaces:

find . -type f -name "*.php" -exec sed -i 's/[ \t]*$//' {} \;


this may also be handy, to strip ^M characters:
(from http://www.computing.net/answers/unix/remove-m-and-line-feeds/6934.html)
anupam May 23, 2005 at 21:11:55 Pacific

Hi..to remove ^M, give the command :
sed -e 's/^M//g' filename
you will have to write the control-M as follows : first press control-V,then control-M,this will show the correct control-M on the command line.
For removing the linefeeds,try this :
sed -e 's/.$//g' filename
this will remove the last character from the line,which happens to be the line feed.


Thursday, November 4, 2010

turn on query timing in postgres

11. How to turn on timing, and checking how much time a query takes to execute ?

# \timing — After this if you execute a query it will show how much time it took for doing it.
# \timingTiming is on.

# SELECT * from pg_catalog.pg_attribute ;
Time: 9.583 ms
 
 
more stuff on: http://www.thegeekstuff.com/2009/04/15-practical-postgresql-database-adminstration-commands/ 

Friday, October 1, 2010

list all cron jobs for all users

quite good post in StackOverflow: http://stackoverflow.com/questions/134906/how-do-i-list-all-cron-jobs-for-all-users


as root:

i modified the original post to show the user's username:

for user in $(cut -f1 -d: /etc/passwd); do echo "crontab for $user:";crontab -u $user -l;  done

dont forget to also:

cat /etc/crontab
 
 
original: 
for user in $(cut -f1 -d: /etc/passwd); do crontab -u $user -l; done

Monday, September 27, 2010

git: prune to remove old remote tracking branches

http://stay-calm.blogspot.com/2009/02/git-prune-to-remove-old-remote-tracking.html


Wednesday, February 4, 2009

git: prune to remove old remote tracking branches

I was trying to delete "somebranch" from a git repository today but got this error message, which baffled me for a bit:

$ git push origin :somebranch
error: unable to push to unqualified destination: somebranch
The destination refspec neither matches an existing ref on the remote nor
begins with refs/, and we are unable to guess a prefix based on the source ref.
fatal: The remote end hung up unexpectedly
error: failed to push some refs to 'git@my_server:my_repo.git'


Doing a 'git branch -a' showed a "origin/somebranch" remote branch. Why can't I delete it? Then I realized that the branch might have been deleted on the remote repository and I haven't updated my remote tracking branches yet. Doing a "git pull" won't remove remote tracking branches for branches that have been deleted. To do that for a remote named "origin", you'll need to use this command:

$ git remote prune origin

cancel script completely on ctrl-c

I found this question interesting: basically how to cancel completely a script and all child processes : You do this by creating a subro...