i needed to use , associate, multiple a different template for each menu item...
here's what I found, 't was easy:
http://www.joomlatribune.com/joomla-tutorials/how-to-use-sections-with-different-templates.html
Tuesday, October 13, 2009
Saturday, October 10, 2009
segmentation fault
in ubuntu, when i installed php5-curl, the next day when I executed a cli script, i got the error "segmentation fault"...
this post helped me get over it: from http://bugs.php.net/bug.php?id=43823
...
I'm having the same problem on 3 diferent Linux distributions Ubuntu,
Debian and Centos. The last one is a 64bits OS.
On Ubuntu and Debian it was solved changing the order of the extensions
on the ini files. In my case I had to load Postgres extension before
CURL.
Friday, October 9, 2009
Option Indexes apache directory listing
today I had a rough time trying to set up my apache for it to show the files in a directory using "Option Indexes"
I fiiinally found out that not only this directive is necessary, but also to have "autoindex" module enabled.
on ubuntu this is done: "a2enmod autoindex"
that's all....
if you want to protect directory listing under a user/password, google this on .htaccess (this is only hint of my file a friend helped me configure):
$ cat .htaccess
AuthUserFile /var/www/data-planteles/.htpasswd
AuthName "my unique name"
AuthType Basic
require valid-user
Monday, September 7, 2009
output console psql postgresql / editor
this post i read really makes psql better: http://merlinmoncure.blogspot.com/2007/10/better-psql-with-less.html
you could also try PAGER="more", i used to like it better
A better psql with less
psql is a great tool, but not very good at browsing data. Or is it? The following settings will make psql much more usable.
in your user profile:
export PAGER=less
export LESS="-iMSx4 -FX"
in your .psqlrc (make it if it's not already there)
\timing
\pset pager always
log in into psql ...
voilà
Thursday, August 6, 2009
How to convert a string to upper or lower case in bash?
How to convert a string to upper or lower case in bash?
Assuming tr is available on the system,
Convert the given argument into an all lower case string.
toLower() {
echo $1 | tr "[:upper:]" "[:lower:]"
}
Convert the given argument into an all lower case string.
toUpper() {
echo $1 | tr "[:lower:]" "[:upper:]"
}
(taken from: http://blog.spikesource.com/bashstringconversion.htm)
Wednesday, July 22, 2009
postgresql delete+join
almost always I think delete+join can be resolved with delete+exists
here's the source:
Re: DELETE with JOIN syntax
* From: Stephan Szabo
* To: Brian Wong
* Cc: pgsql-general(at)postgresql(dot)org
* Subject: Re: DELETE with JOIN syntax
* Date: Wed, 27 Jul 2005 13:14:13 -0700 (PDT)
* Message-id: <20050727130718.V16572@megazone.bigpanda.com>
On Wed, 27 Jul 2005, Brian Wong wrote:
> I am currently migrating from MySQL to PostgreSQL and I have found
> that some queries do not work. For instance,
>
> DELETE t1 FROM t1 LEFT JOIN t2 USING (column_id) WHERE t2.column_id IS NULL;
>
> works in MySQL. This works as expected even though the MySQL
> documentation does not mention the option of having a table between
> the keywords DELETE and FROM.
>
> I am trying to achieve the same affect for PostgreSQL so I tried
>
> DELETE FROM t1 LEFT JOIN t2 USING (column_id) WHERE t2.column_id IS NULL;
>
> and it did not work. Can someone explain to me exactly what is wrong
> with this syntax?
It's mostly that AFAIK SQL has no equivalent syntax.
> Is a table expression produced by the JOIN allowed for a DELETE?
> Im thinking that this would not work because the table expression is
> not a real table and it would not make sense for DELETE to accept such
> a parameter. How can I rewrite this query to achieve the same affect?
I think the where t2.column_id is null where column_id is the joining
column makes this a form of not exists, so maybe:
DELETE FROM t1 WHERE NOT EXISTS (SELECT 1 FROM t2 WHERE t2.column_id =
t1.columnid);
Tuesday, July 7, 2009
Clave de root para mysql
tomado de: http://el-directorio.org/ErroresComunesPhpmyadmin
ARREGLAR ERROR 1045 (28000): Access denied for user 'root'@'localhost' (using password: NO)
* Mi version de mysql es:
mysql Ver 14.12 Distrib 5.0.45
* Este error me salio una vez entre por PHPMyadmin y por error borre el acceso de root en esta parte:
1.png
* Entonces una vez intentaba entrar me salia el siguiente error:
sergiokof:/home/sergiokof# mysql
ERROR 1045 (28000): Access denied for user 'root'@'localhost' (using password: NO)
* Teniendo en cuenta que no le habia colocado ningun password a mysql, y si intentaba entrar por localhost/phpmyadmin/index.php me aparecia lo mismo:
2.png
* La solucion fue la siguiente:
1. Paramos los servicios de mysql:
/etc/init.d/mysql stop
2. con el siguiente comando nos saltamos los privilegios de mysql
/usr/bin/mysqld_safe --user=mysql --skip-grant-tables
3.Abirmos otra consola y escribimos lo siguiente:
sergiokof:/home/sergiokof# mysql
Welcome to the MySQL monitor. Commands end with ; or \g.
Your MySQL connection id is 1
Server version: 5.0.45-Debian_1-log Debian etch distribution
Type 'help;' or '\h' for help. Type '\c' to clear the buffer.
mysql>
4.Ahora que si pudimos ingresar digitamos:
mysql> use mysql;
Reading table information for completion of table and column names
You can turn off this feature to get a quicker startup with -A
Database changed
mysql>
5.Ahora le colocamos una clave a mysql
mysql> UPDATE user SET Password=PASSWORD('password') WHERE user='root';
Query OK, 1 row affected (0.00 sec)
Rows matched: 1 Changed: 1 Warnings: 0
6.Volvemos a iniciar mysql y todo queda perfecto :
sergiokof:/home/sergiokof# mysql -u root -p
Enter password:*************
Welcome to the MySQL monitor. Commands end with ; or \g.
Your MySQL connection id is 7
Server version: 5.0.45-Debian_1-log Debian etch distribution
Type 'help;' or '\h' for help. Type '\c' to clear the buffer.
mysql>
Solución 2 Problema (1045) en phpmyadmin
bueno yo hice una solución muy rara pero funciono y volvi acceder a mi phpmyadmin ya que no podia acceder y me aparecia el error 1045,esto fue por que por que borre los usuarios.
1. entre a /var/www/ruta phpmyadmin por defecto utilizan mucho /var/www/phpmyadmin pero la entrada no la haga atraves de un navegador, utilize el navegador de ventanas en este caso utilice nautilus o una consola.
2.encontrara un archivo llamado config.inc.sample.php abralo y renombrelo como config.inc.php dentro de la misma carpeta y guardelo/var/www/ruta del phpmyadmin.
3. cambiele algunos parametros como
$cfg["blowfish.secret"]=" Aqui colocas una palabra secreta"
$cfg["servers"][$i]["controluser"]=" Aqui colocas el usuario para phpmyadmin"
En esta linea yo volvi a utilizar root , pero puedes utilizar y recrear un nuevo usuario.
$cfg["servers"][$i]["controlpass"]=" Aqui colocas la clave para ese usuario"
Guarde y listo ..¡¡¡¡
*
ya puedes acceder en tu navegador a http://localhost/phpmyadmin y accede con el usuario que colocaste en config.inc.php
Espero que les pueda servir para que no se maten la cabeza ;-)
[sergiokof] [KaL]
#2002 - El servidor no está respondiendo (o el socket del servidor MySQL local no está configurado correctamente
Bueno primero que todo hay que mirar si mysql-server esta instalado completamente, estos lo podemos saber si esta instruccion hace reiniciar o iniciar el socket de mysql.
sudo /etc/init.d/mysql restart
de lo contrario intentemos instalar
apt-get install mysql-server
ahora solo entraremos a la ruta de http://localhost/phpmyadmin y entraremos con el usuario ROOT sin contraseña y listo.
CategoryAyuda
ErroresComunesPhpmyadmin (last edited 2008-07-23 16:07:54 by KaL23)
* Immutable Page
DeleteCache (cached 2009-04-18 19:32:59)
Or try one of these actions: Attachments, CopyPage, Despam, LikePages, Literate, Load, LocalSiteMap, MyPages, PackagePages, PermanentLink, RenderAsDocbook, Save, SpellCheck, SubscribeUser, SyncPages
* MoinMoin Powered
* Python Powered
* GPL licensed
* Valid HTML 4.01
Tuesday, June 9, 2009
update join postgresql
how to do an update + join in postgresql
update product set name = product.name || ':' || prod.name
from product x
inner join prod on prod.seq_id = x.seq_id
where x.seq_id = product.seq_id /* don't forget to filter the to-be-updated-table to queried rows */
http://mssql-to-postgresql.blogspot.com/2007/12/updates-in-postgresql-ms-sql-mysql.html
Wednesday, April 29, 2009
sortable tables
excellent javascript script to have sortable tables very convenient way...
taken from: http://www.kryogenix.org/code/browser/sorttable/
at the time of this post, there is the code... thanks to the author ! !
i can't attach files to a post... sorry folks...
taken from: http://www.kryogenix.org/code/browser/sorttable/
at the time of this post, there is the code... thanks to the author ! !
i can't attach files to a post... sorry folks...
Friday, April 24, 2009
how to: Setup Your Computer to be a Router
step by step for dummies tutorial, taken from: http://ubuntulinuxhowto.blogspot.com/2006/06/setup-your-computer-to-be-router.html
Webmin
Webmin is a web based computer management tool. It is similar to the web interface that you get from routers you buy at stores, but allows you to control most of the computer.
To install webmin, you must first go to its website at www.webmin.com and download the latest version in the top right. Download the tar.gz version into your user folder.

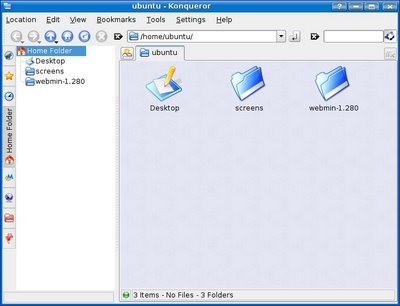
Once the download is complete extract it to a folder for example \usr\webmin. I extracted it into my user folder in this tutorial because this is just a live CD so it doesn't really matter. You may delete the tar.gz file after you extract it as it is no longer needed.
Before you install it you will want the package "libnet-ssleay-perl". So open the terminal and run "sudo apt-get install libnet-ssleay-perl". Now navigate to the directory the folder is (For me it would be "cd /home/ubuntu/webmin-1.280") and then run the command "sudo sh setup.sh".
Config file directory [/etc/webmin]:
# Leave as default, or change as you wish
Log file directory [/var/webmin]:
# Leave as default, or change as you wish
Full path to perl (default /usr/bin/perl):
# Leave as default, or change as you wish
Web server port (default 10000):
# Leave as default or change it to what ever port you want.
Login name (default admin):
# Leave as default, or change as you wish
Login password:
# Choose a password, it will not display anything while you type
Password again:
# Self explanatory
Use SSL (y/n):
# Of course 'y'
Start Webmin at boot time (y/n):
# Once agian... 'y'
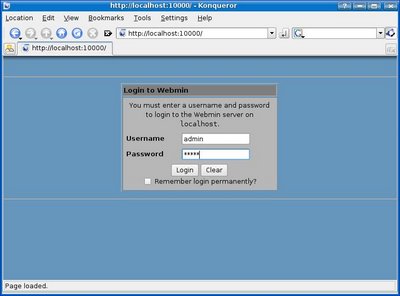
It will not finnish up the installation and you will be able to login by using localhost:port or routerip:port like http://localhost:10000
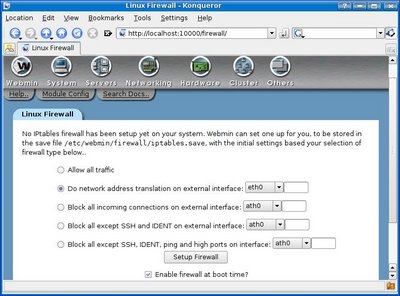
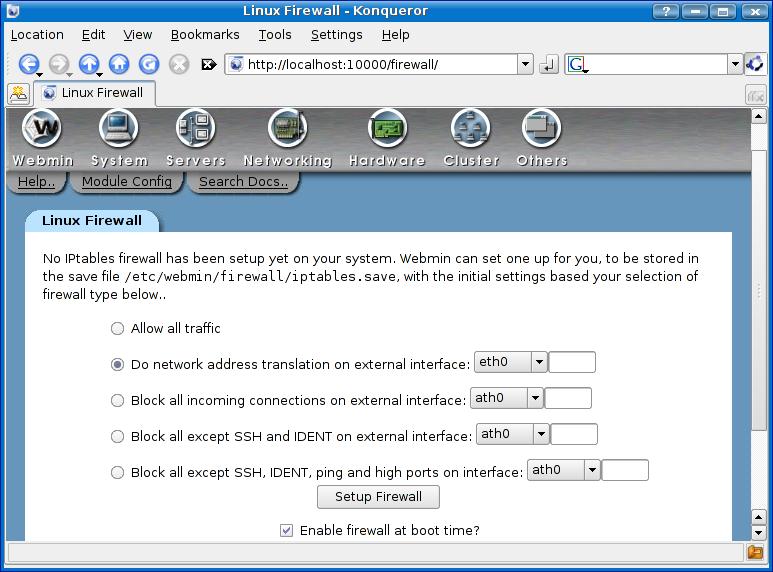
Masquerading
Masquerading is also known as NAT. To enable it, login to Webmin, go to the networking section, and click on firewall. It will ask you to configure it now. press "Do network address translation on external interface:" and choose the external interface (the one that is connected to the internet) and click on "Enable firewall at boot time?" then click on "Setup Firewall".
Now you must add rules to your firewall to allow traffic coming from the internal network, loopback, and traffic related to an outgoing connection (so that you may recieve a response to your requests).
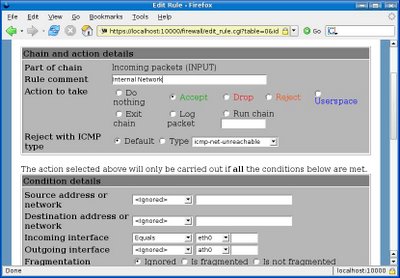
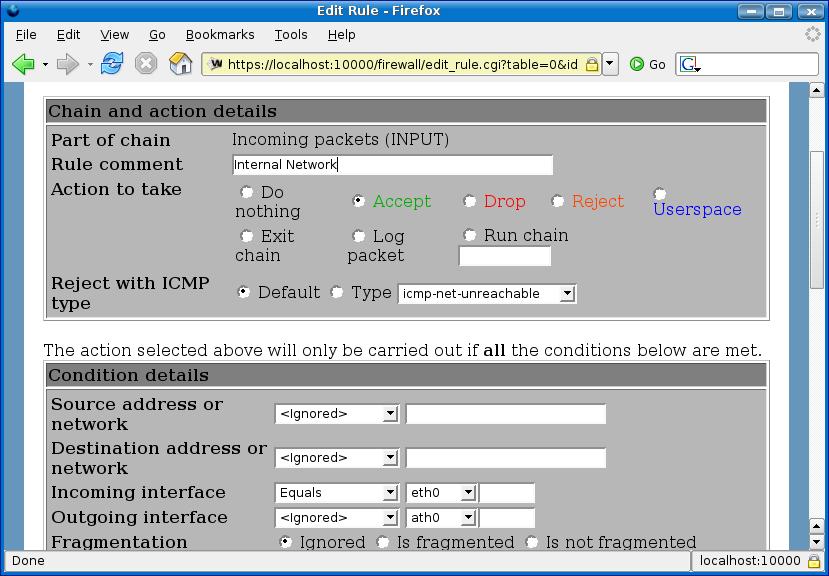
To allow traffic from the internal network, under "Incoming packets (INPUT)" press add rule. Give the rule a comment (name) like internal network and press the button by the "Accept" in green writing. Then down to "Incoming interface" put equals and put your internal interface, in the picture below it is eth0. Scroll down and press create.
Now do the same but put lo as incoming interface.
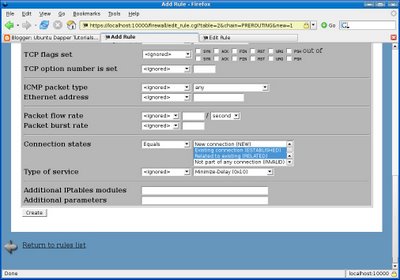
Now you must create another rule for existing connection. Put a comment and press accept. For incoming interface put equals and put your external interface (eth1 for me). Scroll down to "Connection States" and put equals and select both "Existing connection (ESTABLISHED)" and "Related to existing (RELATED)" and press create.
Now you must drop external connections that do not meet any of the other rules, so set the default action of "Incoming packets (INPUT)" to drop and press the button.
Scroll down to the bottom and press apply configuration.
Now go to the System section and click "Bootup and Shutdown". Click "Create a new bootup and shutdown action". Make the name "webmin-ipt" without quotes, make the description whatever you please, and for bootup commands, put "/bin/echo 1 > /proc/sys/net/ipv4/ip_forward" and make a new line and put "/sbin/iptables-restore /etc/webmin/firewall/iptables.save" then press create. Find the bootup command you just created in the list and click it then press Start Now.
Configure DHCP
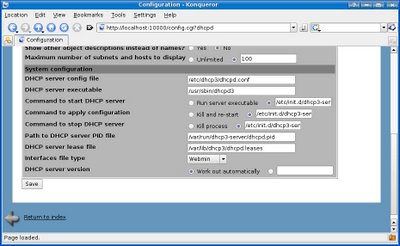
In webmin, go to servers and press DHCP Server and click Module Config.
Replace (without quotes)
DHCP server config file with "/etc/dhcp3/dhcpd.conf"
DHCP server executable with "/usr/sbin/dhcpd3"
Command to start DHCP server with "/etc/init.d/dhcp3-server start"
Command to apply configuration with "/etc/init.d/dhcp3-server restart"
Command to stop DHCP server with "/etc/init.d/dhcp3-server stop"
Path to DHCP server PID file with "/var/run/dhcp3-server/dhcpd.pid"
DHCP server lease file with "/var/lib/dhcp3/dhcpd.leases"
and press save.
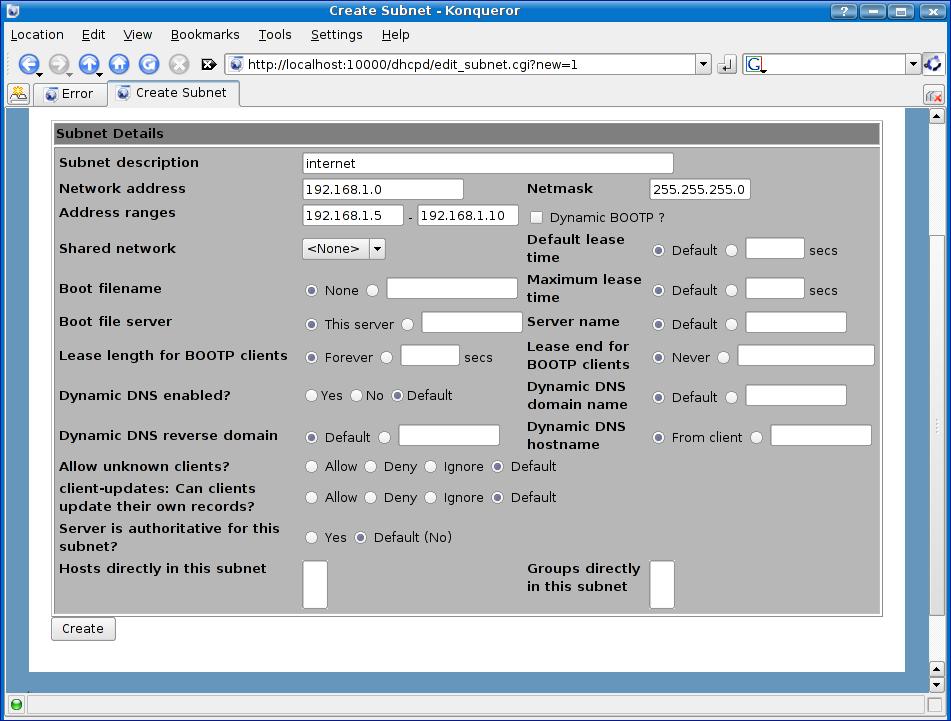
Now press "Add a new subnet" and put a description of this subnet. For network address, make it the same as the internal address but with 0 at the end, for example my internal NIC is 192.168.1.1 so I will put 192.168.1.0 for network address. For address ranges put the range of addrseses for your DHCP server to assign. For netmask put the same as your subnet, most are 255.255.255.0 and press create.

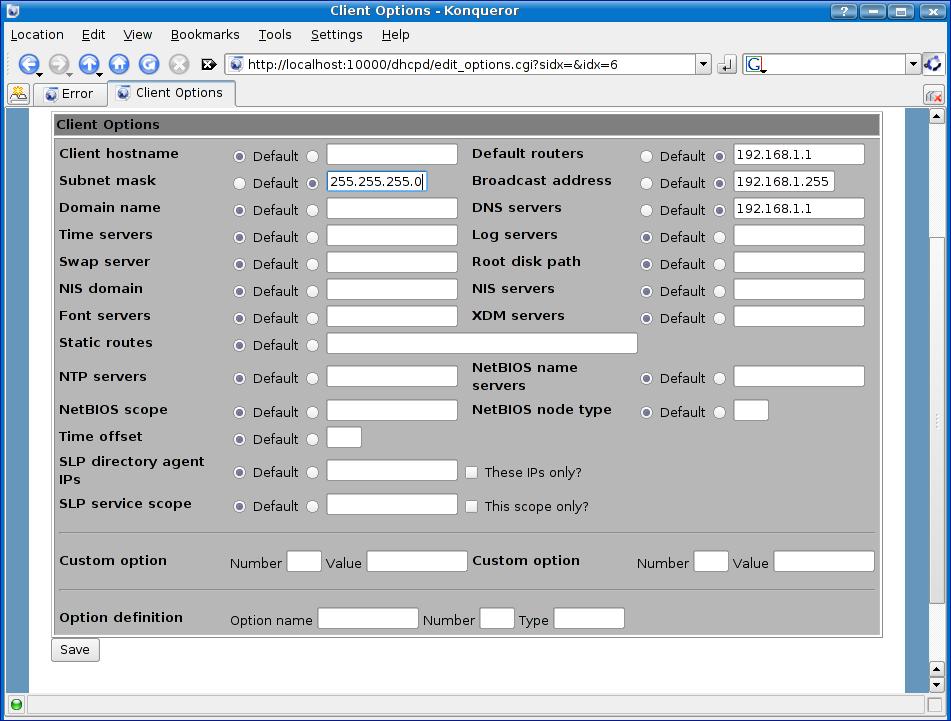
Once created, press the new icon that was just created with the network address you choose under it and scroll down to the bottom and click "Edit Client Options". Fill in Subnet mask with your subnet, default routers and dns servers with your internal IP and broadcast address with the internal ip but 255 at the end (for example my internal ip is 192.168.1.1 so I will put 192.168.1.255 for broadcast) and press save then press start server.

Your computer will now be a DHCP server, router, and DNS server. To do port forwarding, go to the firewall settings in webmin and go to the Network Address Translation (nat) IPTable. From there you can add rules to Packets before routing (PREROUTING).
Setup Your Computer to be a Router
If you have two network cards or some other means of connecting to the internet and a network card in your ubuntu computer, it can be a very powerfull router. You can set up basic NAT, do port forwarding, set up a proxy, and even do packet prioritization so your downloads dont interfere with gaming! This howto will cover setting up Webmin which will be used to configure masquerading, DHCP, and DNS servers. It also lets you configure port forwarding. QoS (packet prioritization) will be covered in a later guide. This guide is made using kubuntu to show that it will work with any version of ubuntu.Webmin
Webmin is a web based computer management tool. It is similar to the web interface that you get from routers you buy at stores, but allows you to control most of the computer.
To install webmin, you must first go to its website at www.webmin.com and download the latest version in the top right. Download the tar.gz version into your user folder.

Once the download is complete extract it to a folder for example \usr\webmin. I extracted it into my user folder in this tutorial because this is just a live CD so it doesn't really matter. You may delete the tar.gz file after you extract it as it is no longer needed.

Before you install it you will want the package "libnet-ssleay-perl". So open the terminal and run "sudo apt-get install libnet-ssleay-perl". Now navigate to the directory the folder is (For me it would be "cd /home/ubuntu/webmin-1.280") and then run the command "sudo sh setup.sh".
Config file directory [/etc/webmin]:
# Leave as default, or change as you wish
Log file directory [/var/webmin]:
# Leave as default, or change as you wish
Full path to perl (default /usr/bin/perl):
# Leave as default, or change as you wish
Web server port (default 10000):
# Leave as default or change it to what ever port you want.
Login name (default admin):
# Leave as default, or change as you wish
Login password:
# Choose a password, it will not display anything while you type
Password again:
# Self explanatory
Use SSL (y/n):
# Of course 'y'
Start Webmin at boot time (y/n):
# Once agian... 'y'
It will not finnish up the installation and you will be able to login by using localhost:port or routerip:port like http://localhost:10000

Masquerading
Masquerading is also known as NAT. To enable it, login to Webmin, go to the networking section, and click on firewall. It will ask you to configure it now. press "Do network address translation on external interface:" and choose the external interface (the one that is connected to the internet) and click on "Enable firewall at boot time?" then click on "Setup Firewall".
Now you must add rules to your firewall to allow traffic coming from the internal network, loopback, and traffic related to an outgoing connection (so that you may recieve a response to your requests).
To allow traffic from the internal network, under "Incoming packets (INPUT)" press add rule. Give the rule a comment (name) like internal network and press the button by the "Accept" in green writing. Then down to "Incoming interface" put equals and put your internal interface, in the picture below it is eth0. Scroll down and press create.
Now do the same but put lo as incoming interface.
Now you must create another rule for existing connection. Put a comment and press accept. For incoming interface put equals and put your external interface (eth1 for me). Scroll down to "Connection States" and put equals and select both "Existing connection (ESTABLISHED)" and "Related to existing (RELATED)" and press create.

Now you must drop external connections that do not meet any of the other rules, so set the default action of "Incoming packets (INPUT)" to drop and press the button.
Scroll down to the bottom and press apply configuration.
Now go to the System section and click "Bootup and Shutdown". Click "Create a new bootup and shutdown action". Make the name "webmin-ipt" without quotes, make the description whatever you please, and for bootup commands, put "/bin/echo 1 > /proc/sys/net/ipv4/ip_forward" and make a new line and put "/sbin/iptables-restore /etc/webmin/firewall/iptables.save" then press create. Find the bootup command you just created in the list and click it then press Start Now.
Configure DHCP
In webmin, go to servers and press DHCP Server and click Module Config.
Replace (without quotes)
DHCP server config file with "/etc/dhcp3/dhcpd.conf"
DHCP server executable with "/usr/sbin/dhcpd3"
Command to start DHCP server with "/etc/init.d/dhcp3-server start"
Command to apply configuration with "/etc/init.d/dhcp3-server restart"
Command to stop DHCP server with "/etc/init.d/dhcp3-server stop"
Path to DHCP server PID file with "/var/run/dhcp3-server/dhcpd.pid"
DHCP server lease file with "/var/lib/dhcp3/dhcpd.leases"
and press save.

Now press "Add a new subnet" and put a description of this subnet. For network address, make it the same as the internal address but with 0 at the end, for example my internal NIC is 192.168.1.1 so I will put 192.168.1.0 for network address. For address ranges put the range of addrseses for your DHCP server to assign. For netmask put the same as your subnet, most are 255.255.255.0 and press create.
Once created, press the new icon that was just created with the network address you choose under it and scroll down to the bottom and click "Edit Client Options". Fill in Subnet mask with your subnet, default routers and dns servers with your internal IP and broadcast address with the internal ip but 255 at the end (for example my internal ip is 192.168.1.1 so I will put 192.168.1.255 for broadcast) and press save then press start server.
Your computer will now be a DHCP server, router, and DNS server. To do port forwarding, go to the firewall settings in webmin and go to the Network Address Translation (nat) IPTable. From there you can add rules to Packets before routing (PREROUTING).
port forwarding
easy steps using webmin: taken from http://ubuntuforums.org/showthread.php?t=504092&page=3
Re: Webmin Setup DNS/DHCP/NAT/Port Forwarding/Domain
Setting up port forwarding
On a network that uses NAT to hide internal systems from the Internet, outside hosts cannot connect directly those on the internal network. This is great for security, but can be annoying if there is some internal service that you do want to make available to the outside world. For example, your mail server system may not be the firewall host, which would normal make it inaccessible from the Internet. Fortunately, there is a solution to this problem - port forwarding.
This lets you re-direct all connections to some port on the firewall system to a different host and port on your internal network. For a mail server, all data received on port 25 might be send to the same port on the host that is actually being used to host user email. Of course, this would make it impossible for your firewall system to receive email itself.
To set up port forwarding, follow these steps :
1. On the main page of the Linux Firewall module on the gateway system, select Network address translation from the list next to the Showing IPtable button before clicking it.
2. In the Packets before routing section, click on Add rule to go to the rule creation form. The rule being added will redirect all external traffic received by the firewall to some internal address.
3. Set the Action to take to Destination NAT.
4. In the IPs and ports for DNAT field, select IP range and enter the address of the internal host into the adjacent text box, such as 192.168.1.10. In the Port range box, enter the port number on the internal host to which data should be sent, such as 25 for SMTP, 110 for POP3 or 80 for HTTP.
5. Set the Network protocol to Equals and select TCP.
6. In the Destination TCP or UDP port field, select Equals from the menu and enter the external port number for which forwarding should be done into the adjacent text field. Typically this will be the same as the port entered in step 4.
7. Hit the Save button to create the rule and return to the main page, and then click the Apply Configuration button.
The only problem with this method is that connections from inside your network to the firewall system will not be forwarded to the other host.
Wednesday, April 15, 2009
postgresql - How to determine the size of a database on disk
taken from: http://www.postgresonline.com/journal/index.php?/archives/110-Determining-size-of-database,-schema,-tables,-and-geometry.html
How to determine the size of a database on disk
SELECT pg_size_pretty(pg_database_size('somedatabase')) As fulldbsize; How to determine the size of a database table on disk
NOTE: There are two functions in PostgreSQL - pg_relation_size and pg_total_relation_size. The pg_relation_size just measures the size of the actual table where as the pg_total_relation_size includes both the table and all its toasted tables and indexes.
SELECT pg_size_pretty(pg_total_relation_size('someschema.sometable')) As fulltblsize, pg_size_pretty(pg_relation_size('someschema.sometable')) As justthetblsize;

--------------
Determining size of database, schema, tables, and geometry
Postgres OnLine Journal

 About the Authors Consulting PostgreSQL PostGIS Paragon Book Store
Saturday, March 28. 2009Determining size of database, schema, tables, and geometryTrackbacks Trackback specific URI for this entry No Trackbacks   | QuicksearchCalendarCategoriesSyndicate This BlogPowered by Wikipedia FinderBlog Administration |


Subscribe to:
Posts (Atom)
-
tomado de: http://el-directorio.org/ErroresComunesPhpmyadmin ARREGLAR ERROR 1045 (28000): Access denied for user 'root'@'localho...
-
I've been using WinScp and a script to compress files at maximum compressión, name the file as name_YYMMDD-HHMM.rar, and send them to a...
-
Styling Excel cells with mso-number-format mso-number-format:"0" NO Decimals mso-number-format:...
